Sidebar
Table of Contents
Apartment Security System
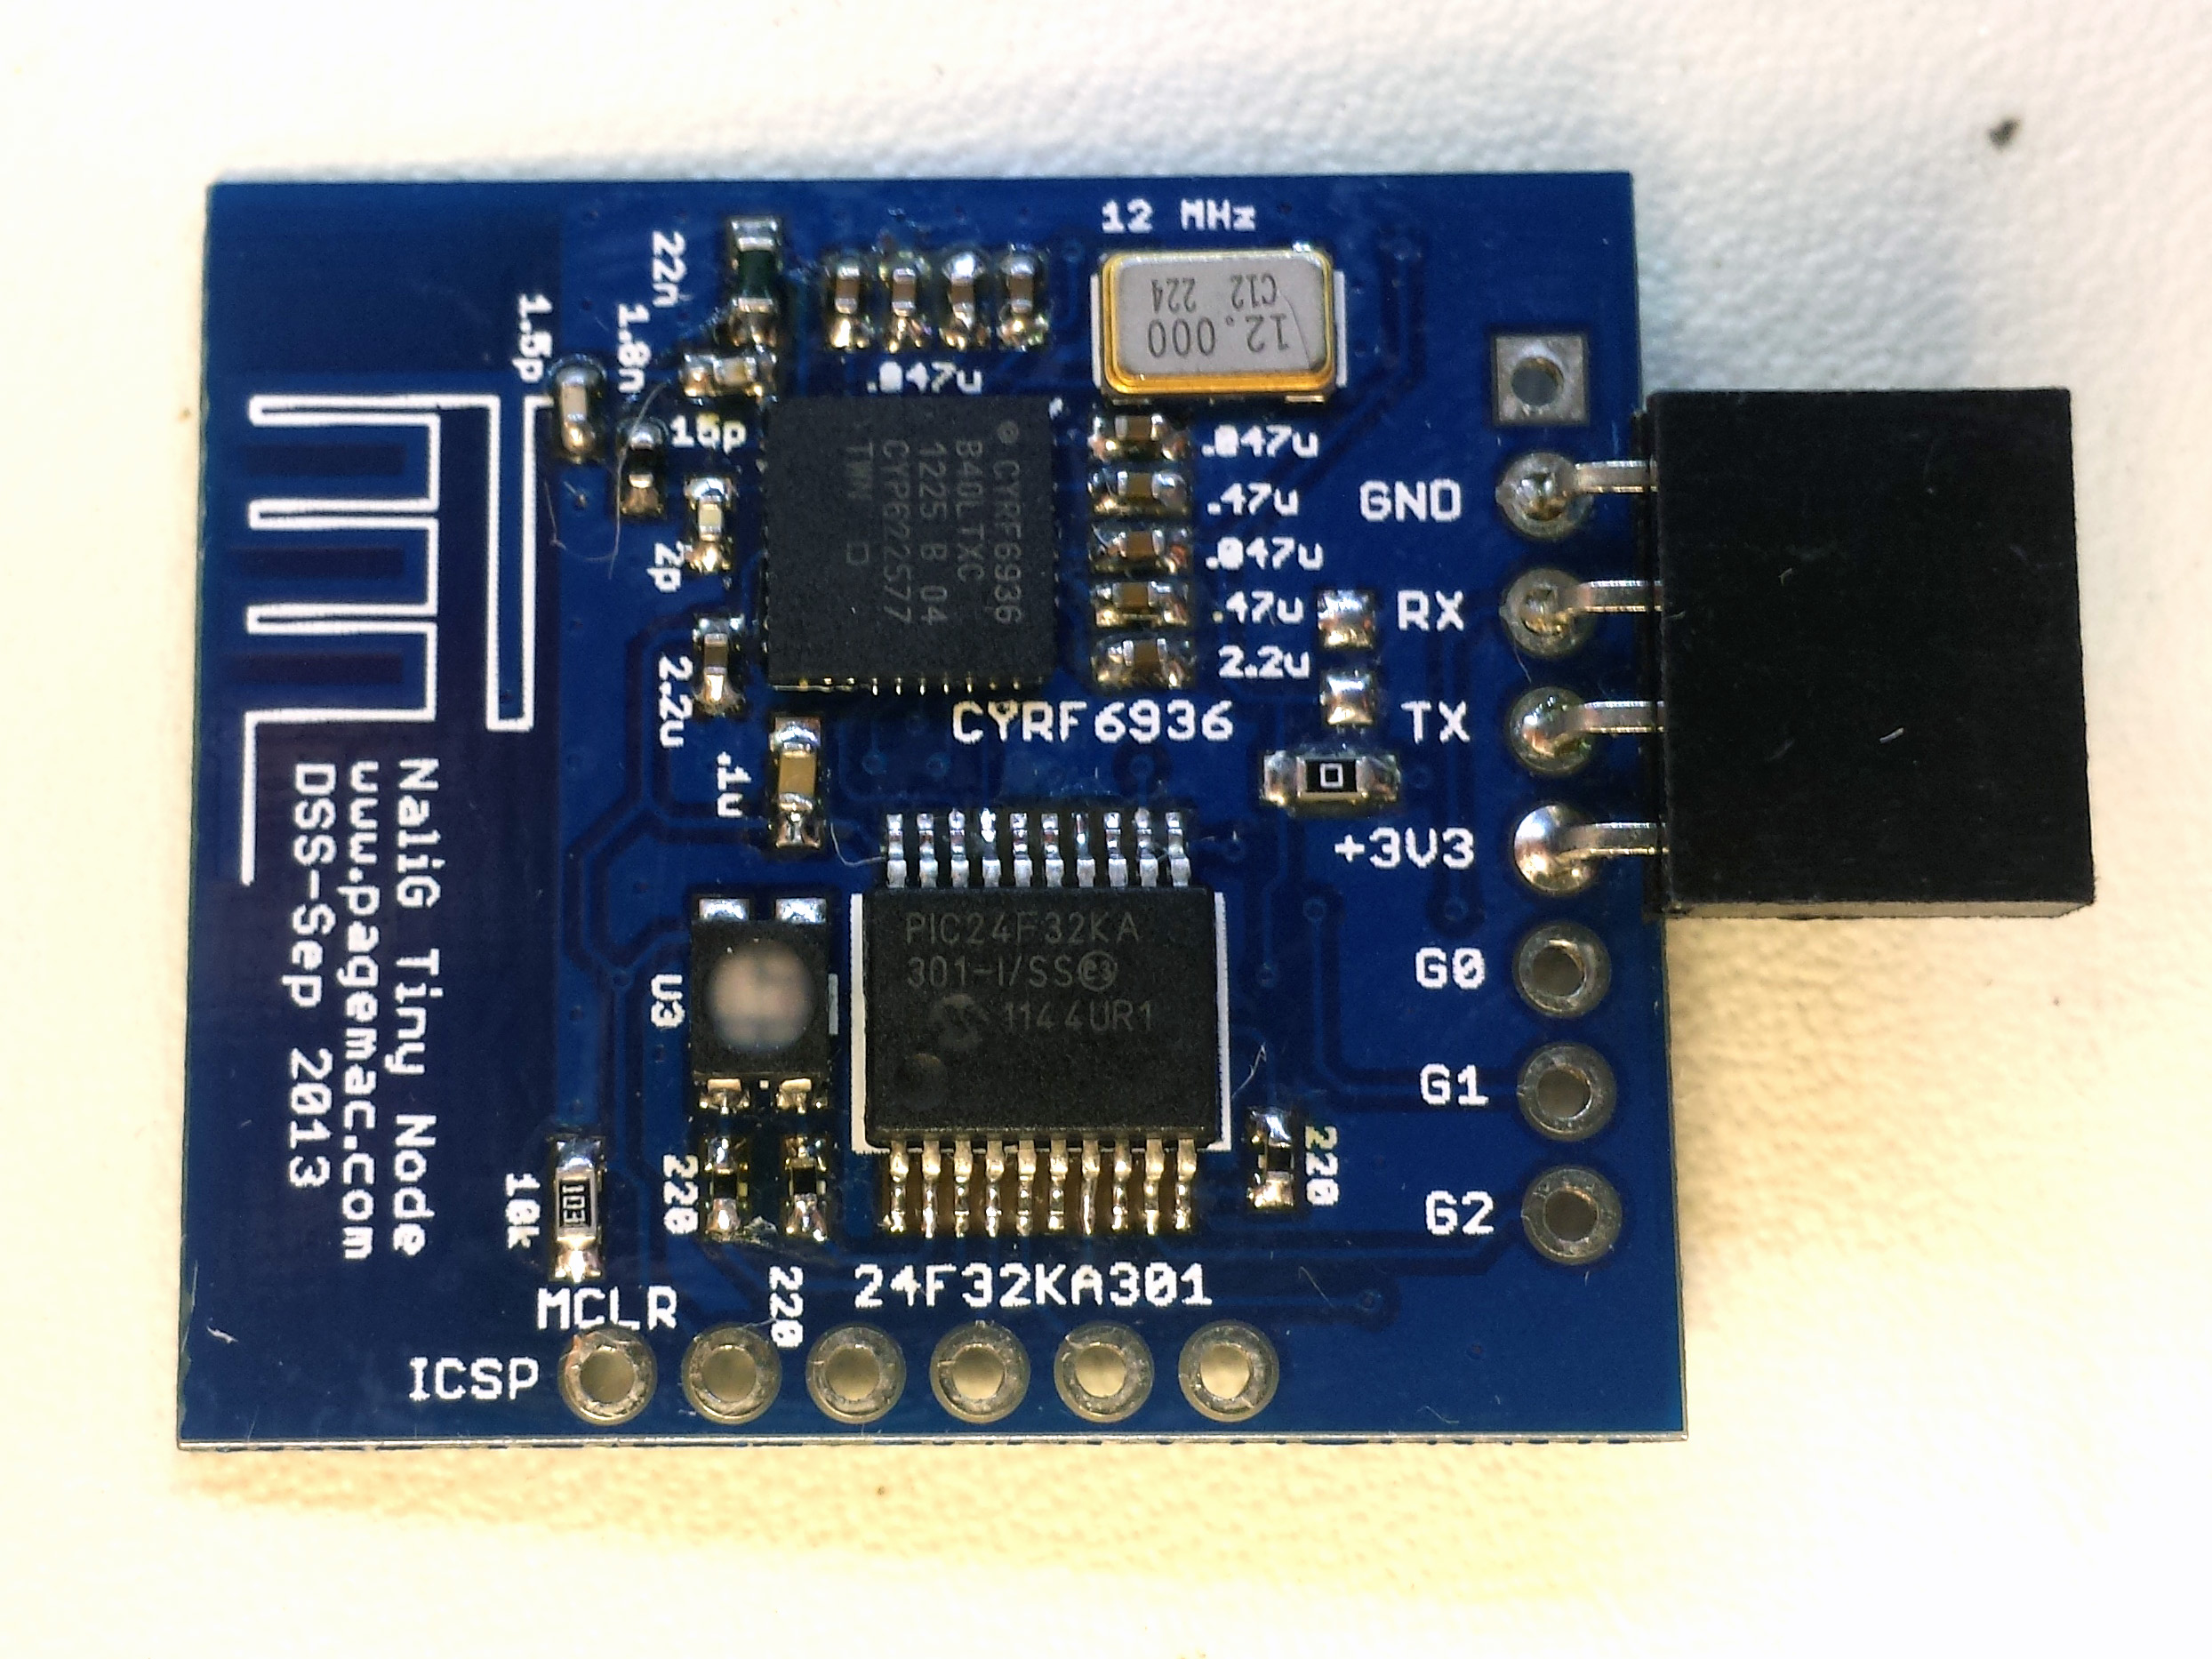
The Nali Guardian System is my own personal security and home automation system. I have always dreamed of having a real home automation system, and so in the fall of 2012 I started designing my own system. Since the beginning, I have been following the “build it myself” approach over buying existing products or modules. The very first component that I built - the 2.4 GHz mesh network wireless modules - could have been mostly replaced with one of the many off-the-shelf wireless mesh network modules that already exist. But, much like when I decided to write my own programming language to learn when I was younger, I want to build many parts of the system on my own to improve my engineering skills. Of course, this means that it takes a very long time to build this system in my spare time, but it has been a really fun project that I will continue to improve upon.
Architecture
The system is composed of a master node and a number of wireless sensor nodes. Each node consists of a wireless module and one or more sensors connected to the module. The wireless modules can communicate with any other wireless module on the network, although in general communication is carried out directly between the master node and and the sensor. Communication between wireless modules is usually for mesh network routing.
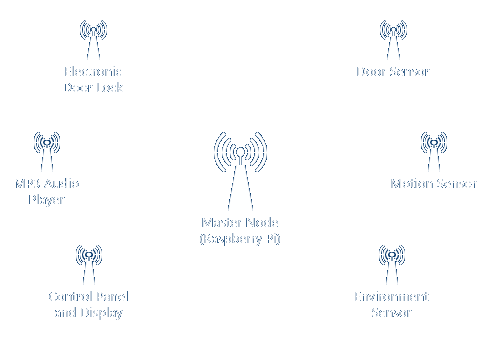
Each node is assigned an 8 bit address and 8 bit node type, and each are represented by two ASCII hexidecimal characters. The valid node range is 0x01 through 0xFD. (FE and FF are reserved for address assignment functions) Both the node address and node type are used for wireless communication as well as system node management. Messages can be sent to an individual node or to all nodes of a specific type. For example, if I want to play a sound from all audio nodes, a single wireless command can be sent to all nodes and only the audio nodes will process the data.
Users can interact with the system through the various nodes (control panels or keyfobs) or through the web interface.
Master Node
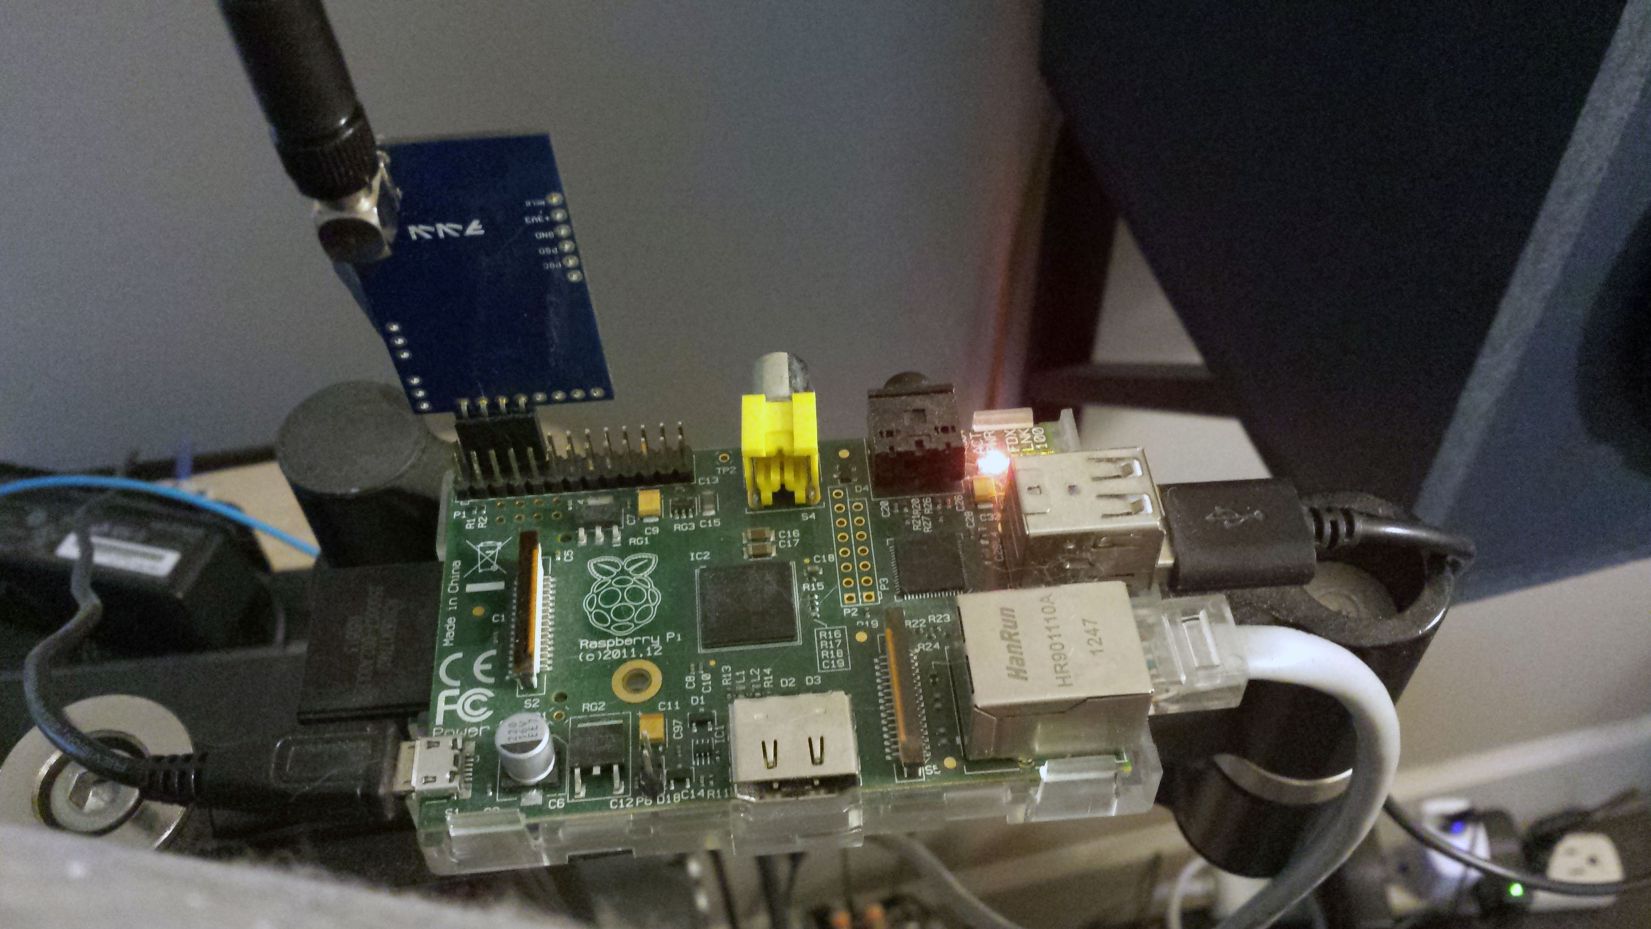
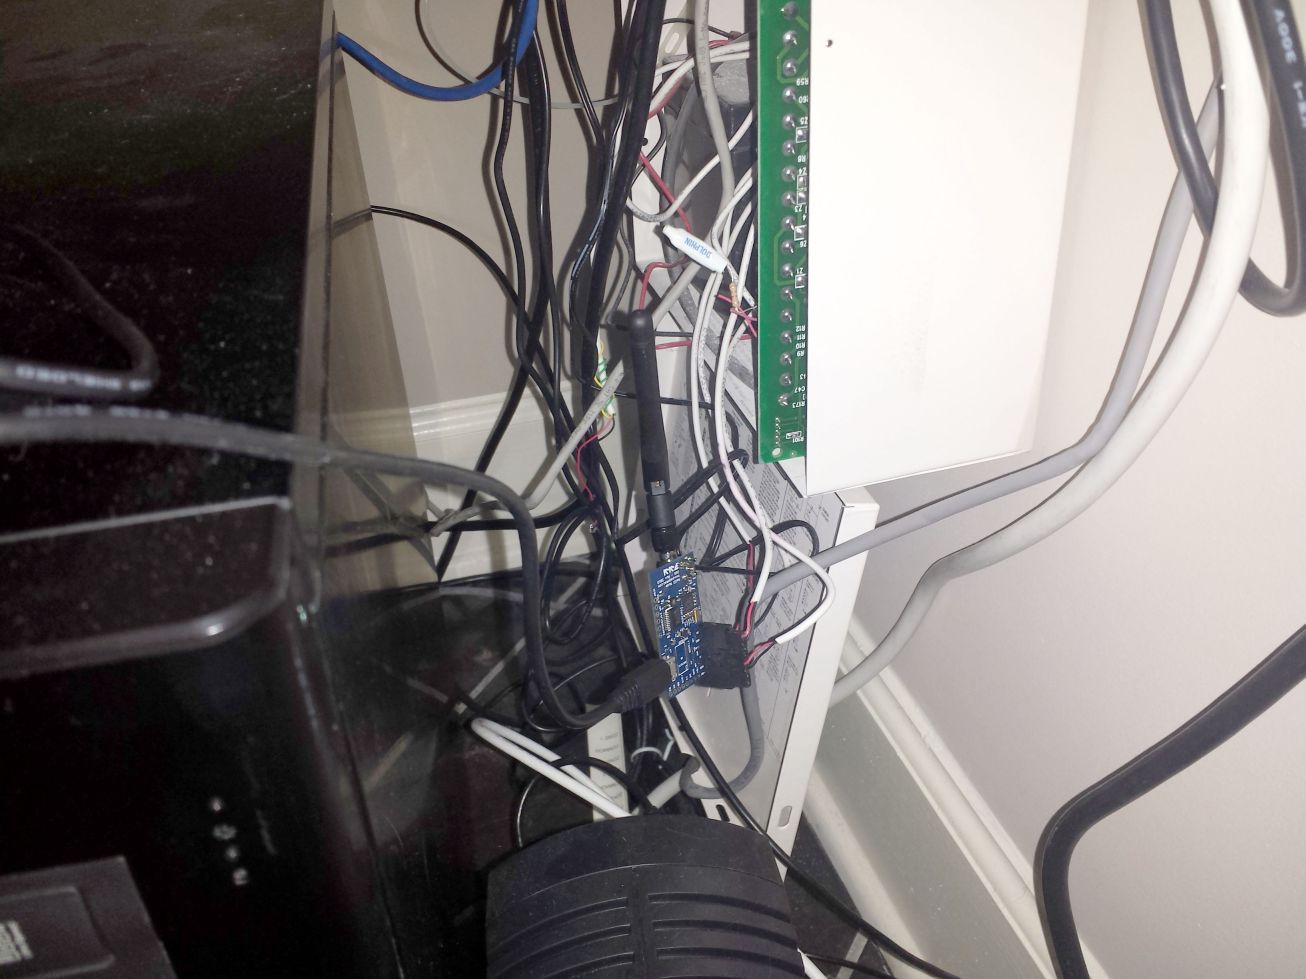
The master node is a Raspberry Pi 1 Model B with a wireless module connected on the Pi's expansion port. The main security system logic (the “master node”) is a python script that runs on startup, and this script communicates with the wireless module using serial. The python script acts as an interface between all the wireless modules in the system and the web GUI. Data is stored in a MySQL database, which allows easy synchronization with the web interface.
Unfortunately, having a single master node is a bit of a system weakness. If the Raspberry Pi fails, or the python script fails, or the wireless module fails, then the rest of the system will also cease to function correctly. Fortunately, I have spent a lot of time improving the reliability of the system by implementing a lot more error checking, redundant scripts, and the ability for the wireless module to reset the Pi with a GPIO pin.
System Operation
On startup, the master node will retrieve a list of nodes from the MySQL database. It will ping each node to confirm it exists, request the node's status, and send any other system initialization commands (such as resetting the LED display). The system will play a nice startup sound, then wait for something to happen!
Every 60 seconds, the master node will ping all active nodes. If the system hasn't detected a node for 2 minutes, it will report the node as “lost”. This is to keep track of which nodes are still active in the system, and to fix any potential problems. In the early days of the system when the wireless nodes weren't particularly reliable, the wireless nodes would sometimes encounter an error and lock up, requiring a reset. These problems have been fixed, but it's still nice to know when a module is accidentally unplugged!
In addition to pinging nodes every 60 seconds, the system will also request environmental data from EnviroNodes, confirm the open/close state of various objects, and verify the connection to the database.
When I leave my apartment, I arm the system using either a keyfob on my keys or a control panel by the door. The system counts down for 10 seconds (with a countdown sound effect, and the control panels will display a time ticker), then the system is Armed. The control panels turn red, the motion sensors are enabled, and the camera turns on.
If a security event is triggered (like a door opening), all of the lights and control panels flash yellow, and an alarm is sounded. When this happens, you have about 30 seconds to disarm the system before the main alarm goes off. If a valid code is entered, the security system is disabled, and the control panels change to green. If no valid codes are entered, the lights begin flash red, an alarm goes off, and an e-mail is sent to my phone.
INSERT YOUTUBE VIDEO
Sensors and Nodes
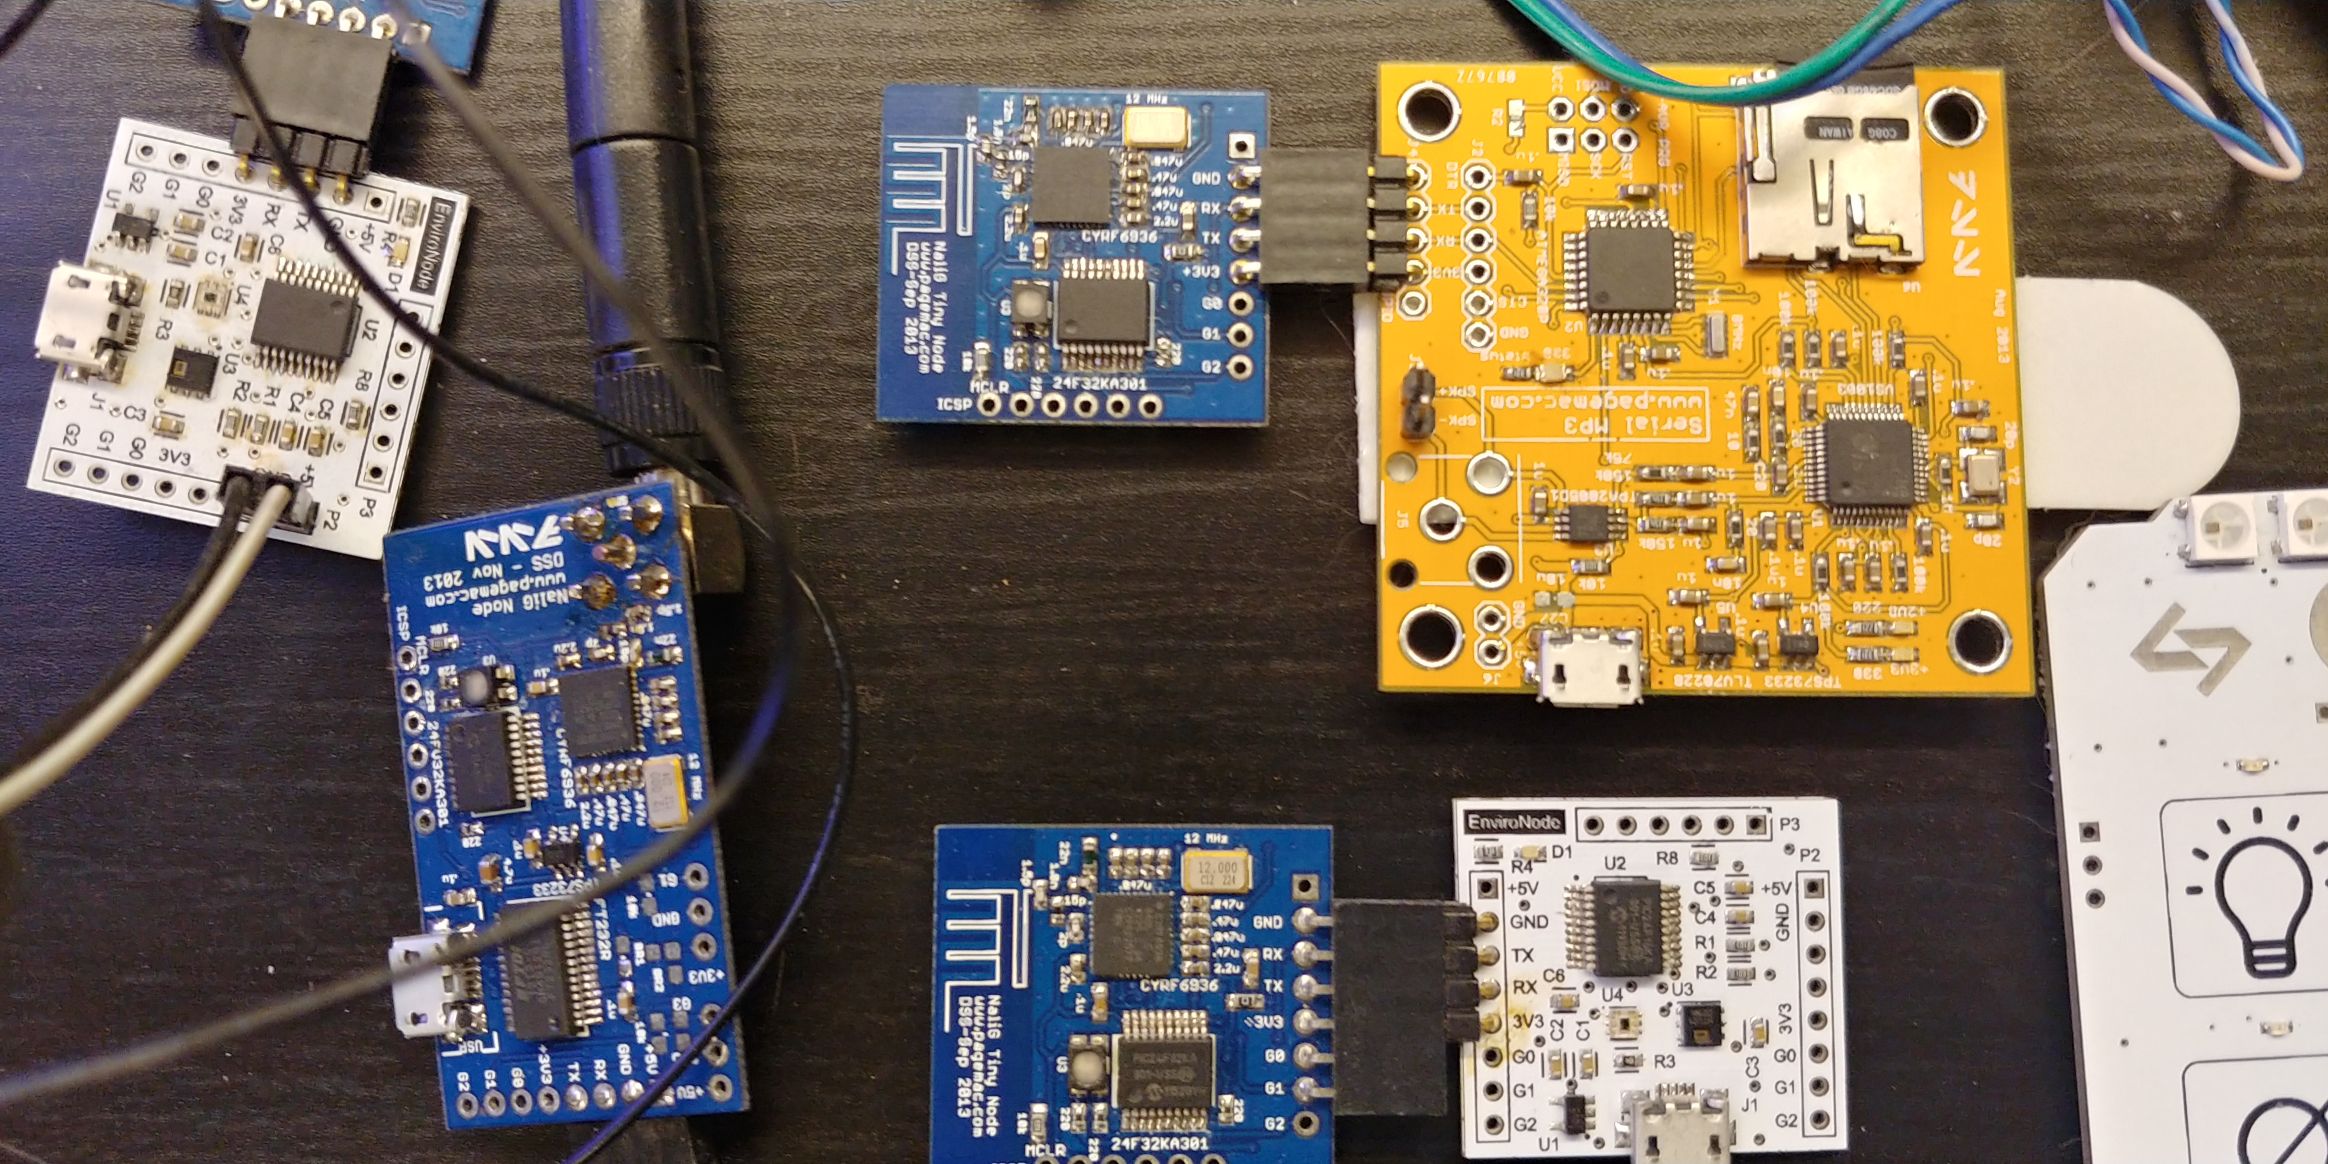
Originally, it was planned that a node would either use serial communications to talk to a sensor or it would use one of the 4 GPIO pins on the wireless module. For example, an audio node would communicate with a serialMP3 module over serial, or a door sensor would associate each of the 4 GPIO pins with a door. However, the system evolved to much more flexible. Each of the GPIO pins can be configured
Audio Nodes
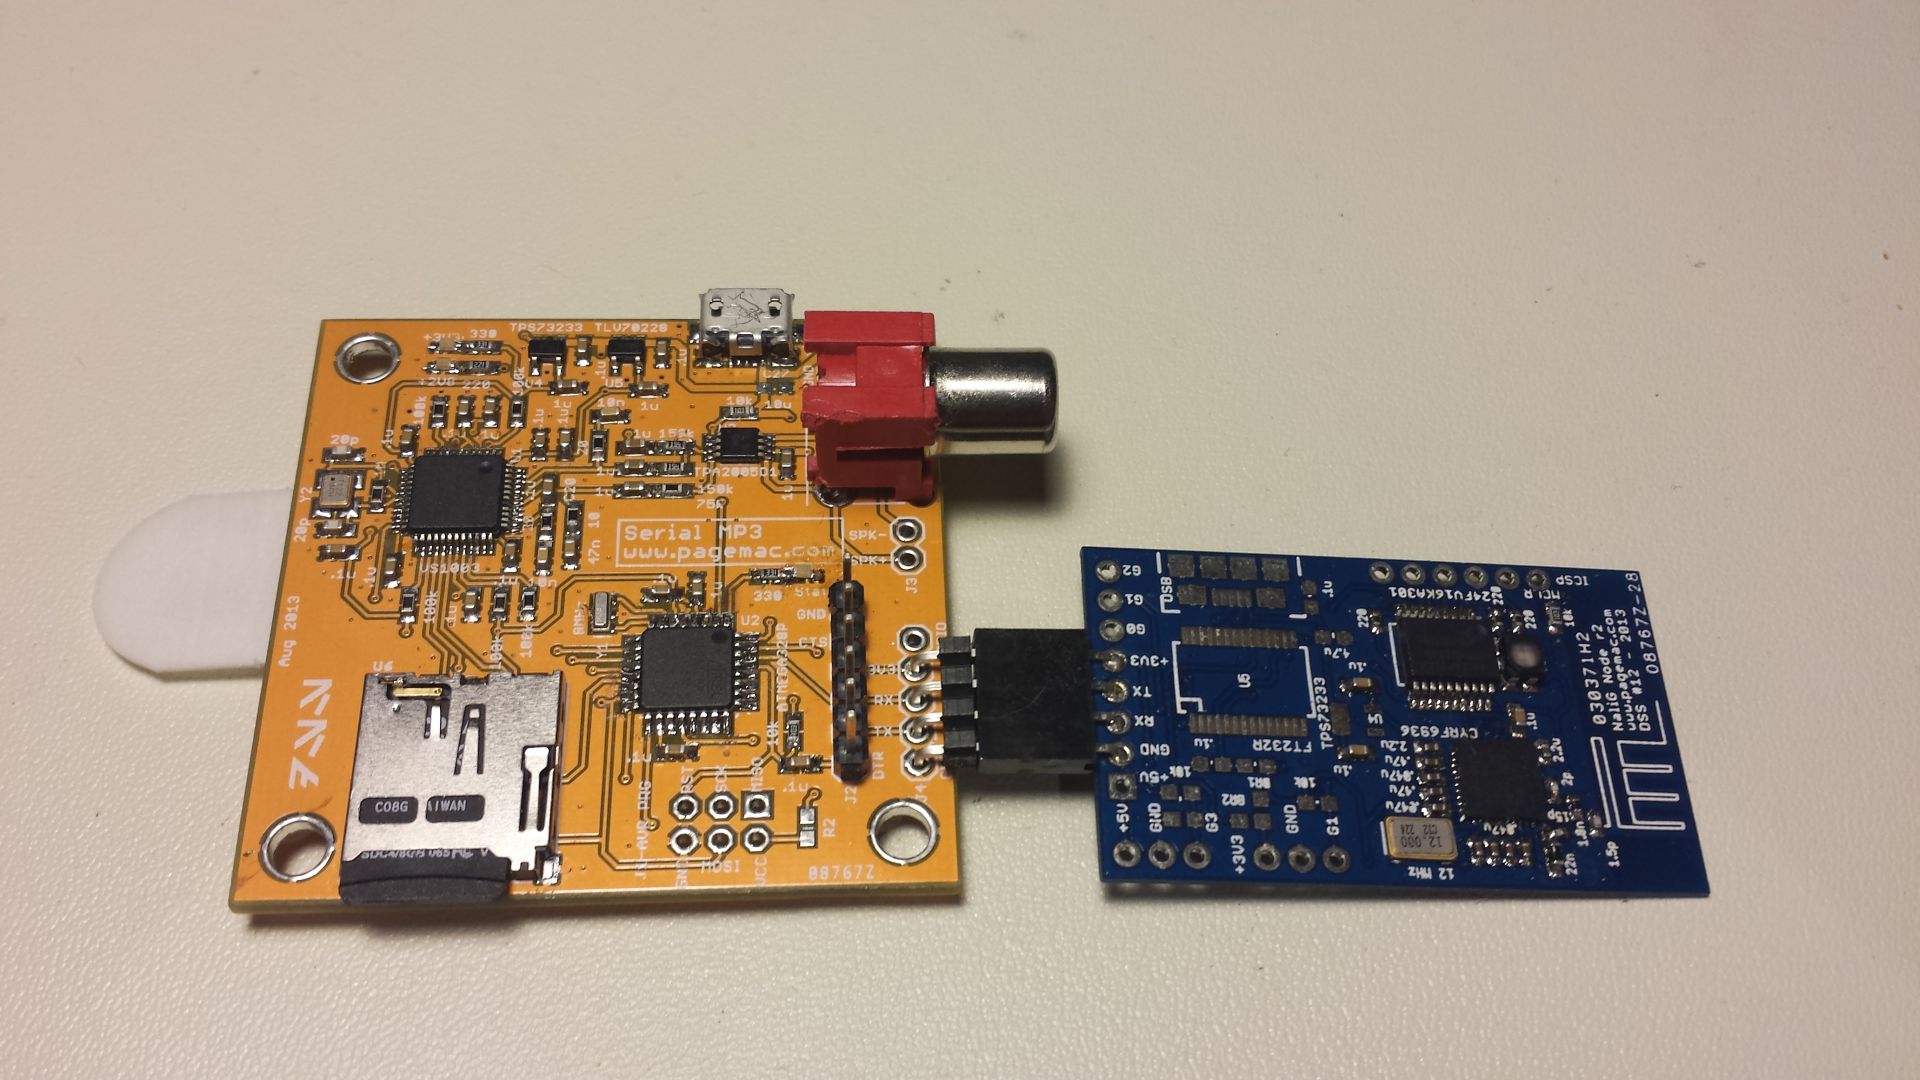
Audio nodes are connected over serial to a serialMP3 module. These nodes play various sounds such as a door open chime, motion sensor sound alerts, or a siren when the alarm is set off.
The serialMP3 modules work fantastic most of the time, but there are some synchronization issues when trying to play the same sound from multiple modules. Although each module receives the serial command to play the sound within a few tens of milliseconds of each other, sometimes it takes longer to play on one module vs another, and the sounds can be noticably out of sync. This isn't really an issue for alarms and chimes, but I do play some voice announcements. I've found that the best solution is to format the SD card every time I add new sounds - this ensures the file system is roughly identical on each card, and the sounds play reasonably synchronized this way. Still, in the future, it would be nice to have more of a wireless audio streaming system.
Motion Sensors
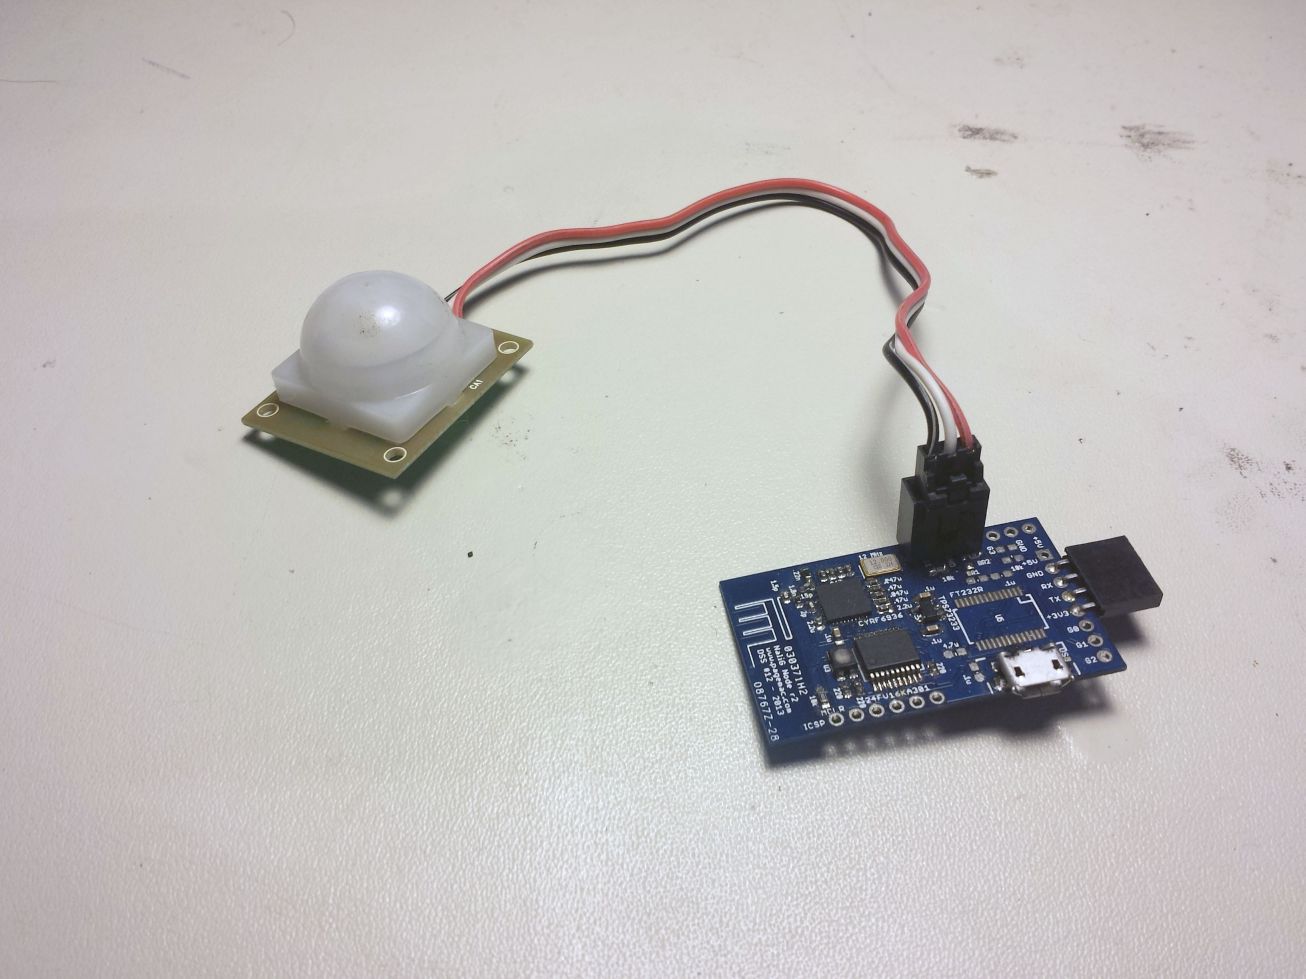
Motion sensor nodes are connected to one or more PIR motion sensors using the GPIO pins. I have an indoor and outdoor motion sensor configured for my apartment. The indoor motion sensor is disabled when the security system is disarmed, and enabled when armed. The outdoor sensor is always enabled, but doesn't set off the alarm. I've had some problems with the sun shining right on the sensor and causing it to go off randomly. However, it is useful to know when someone is walking up to my door a couple seconds in advance of them reaching the door!
The motion sensor can actually trigger a several times in a second, so I added an optional parameter to limit the number of detentions to once per second.
Door Sensors
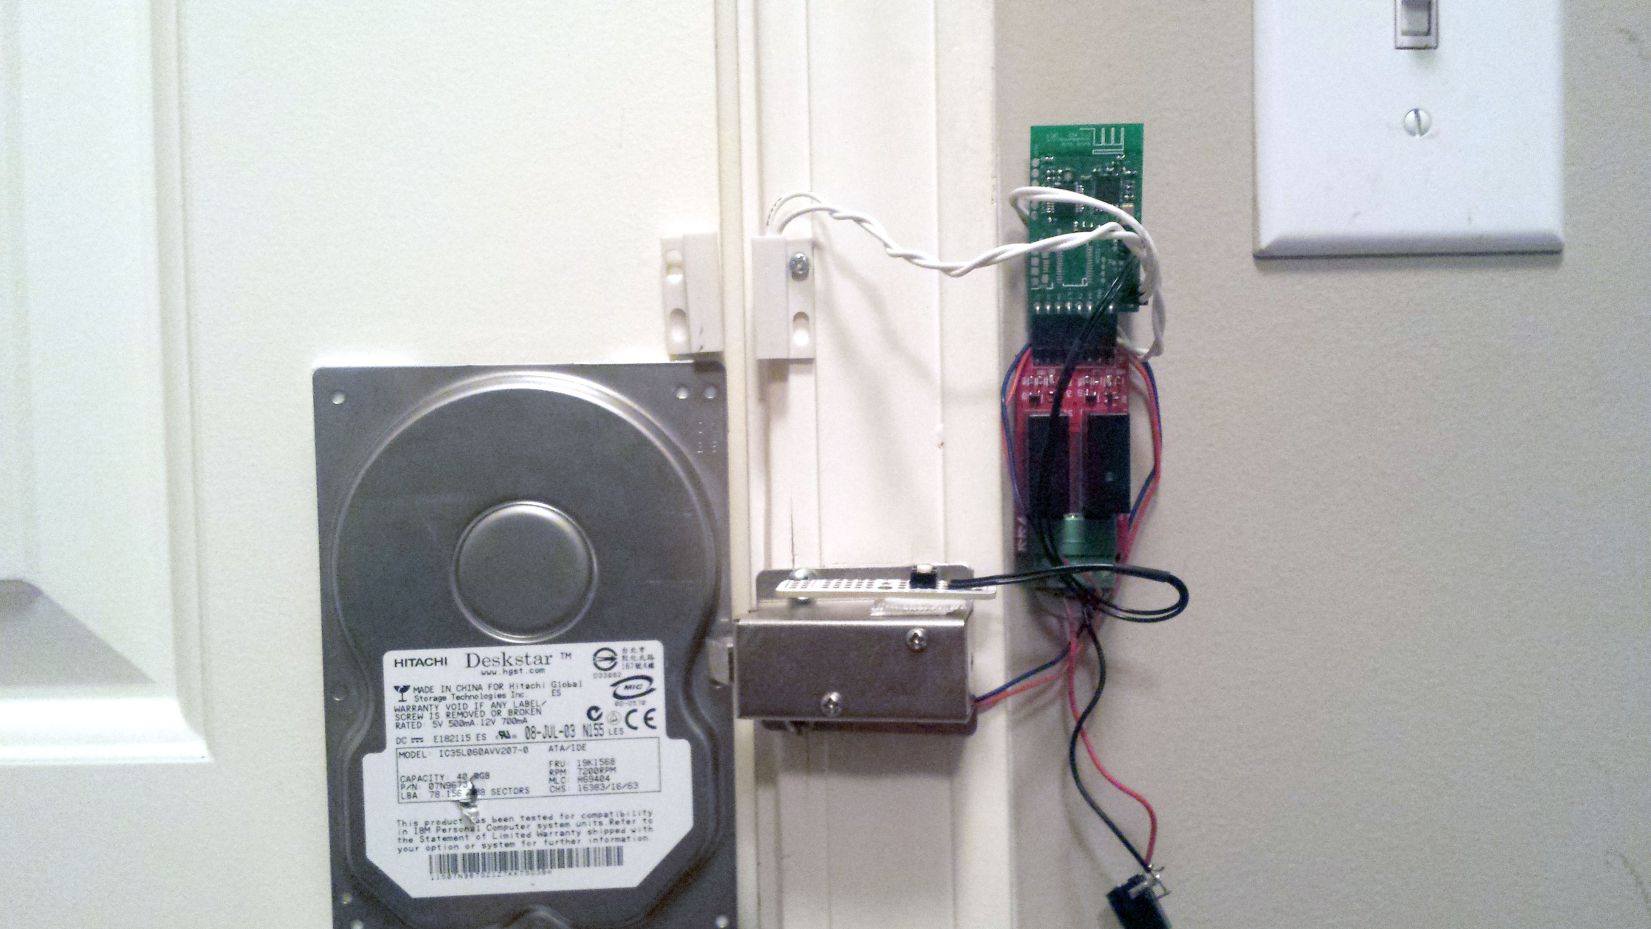
A door can be monitored with a single I/O pin on a wireless module using a magnetic contact switch, like this one from Adafruit. The GPIO pin is configured as an input with a pull-up provided by the microcontroller, and the contact switch is wired between the input and ground. The pin goes high when a door is opened and low when a door is closed, although the software events can be re-configured via the web interface for different hardware. Each tiny wireless node has 3 GPIO pins, and a full-sized node has 4 GPIO pins.
Most home security systems also use similar magnetic contact switches. My apartment happened to be already wired with a security system, and each door and window has it's own pair of wires. Some systems are “zoned” so that multiple doors or windows are daisy chained into a single loop, which means you can't identify specific doors being opened. I was able to disconnect the wires from the screw terminal block, crimp it on to a connector and connect it to one of my wireless modules.
EnviroNodes
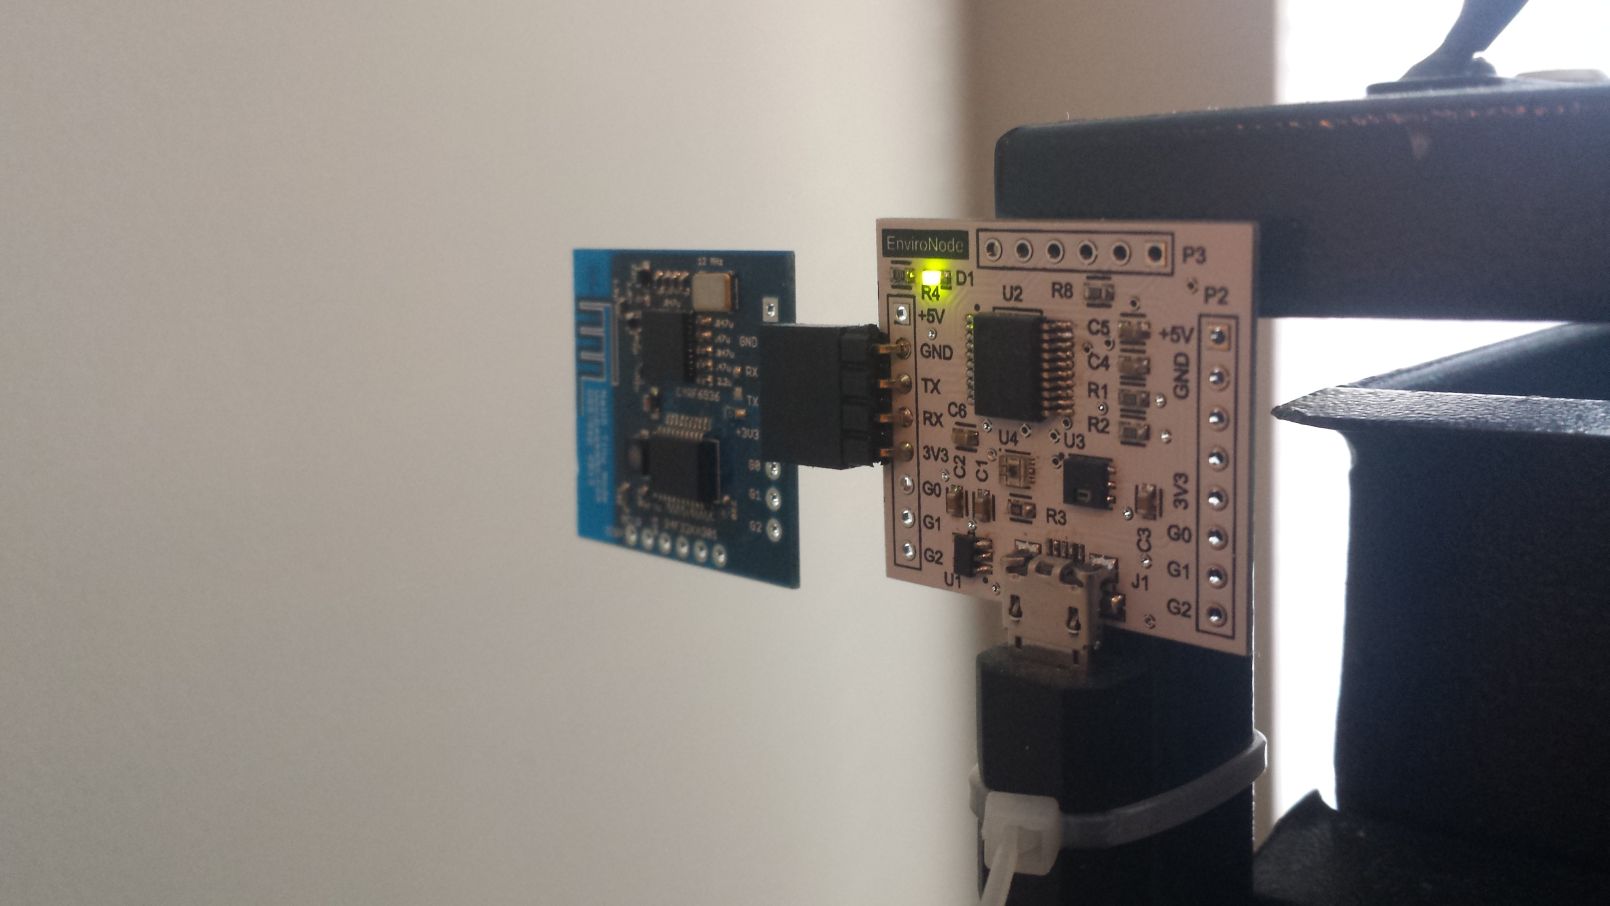
EnviroNodes are connected over serial to an EnviroNode module. This node can make temperature, humidity, and ambient light measurements.
Every 60 seconds, the master node queries each EnviroNode for the current temperature, humidity and ambient light measurements. The data is stored in the MySQL database and can be viewed from the web interface. The system will also enable the ambient lights when I come home and disable the security and the room is dark.
The system doesn't do much else with the environmental data, but in the future I'd like to integrate the data with a more intelligent thermostat. I could set the temperature set point to be an average temperature of several rooms, or just for one specific room. It could also implement a daily schedule and use the door and motion sensors to activate, kind of like the Nest.
Control Panels
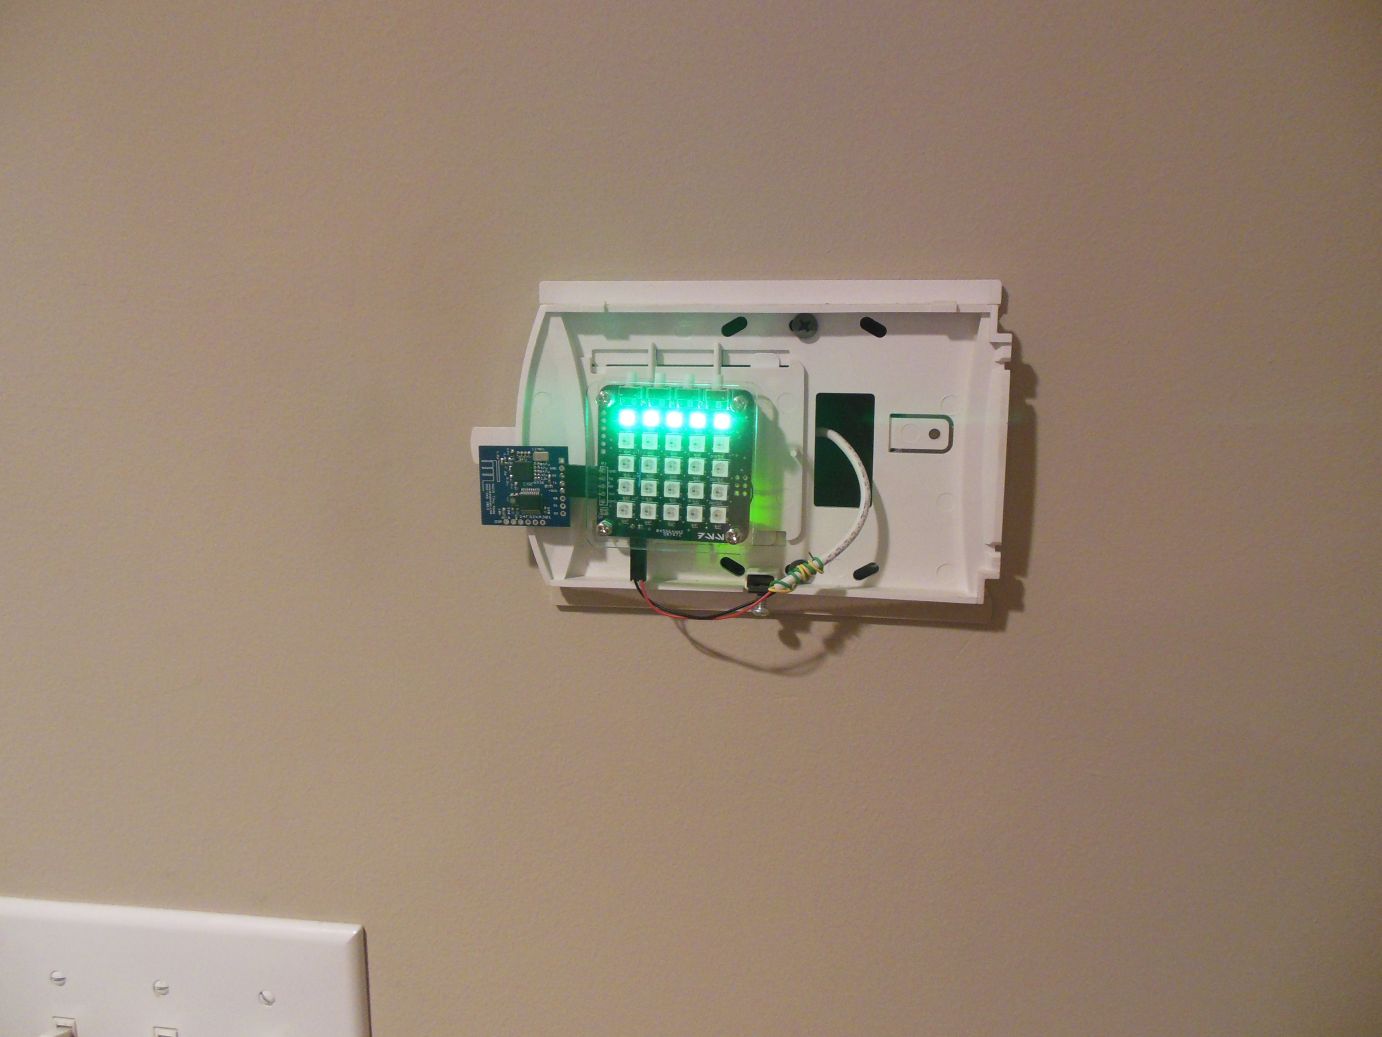
Control Panels are connected over serial to an LED Panel module. I didn't really intend for these to become “control panels” - I wanted to build something else with an LCD display and a keypad. But, the LED_Panels I built for ambient lighting had buttons, LED's and a buzzer, so they work fairly well as control panel.
This node uses the same 5×5 array of RGB LED's, but in addition to ambient lighting, the LED's are also used to display animations like door open/closed, locked/unlocked, and other such messages.
I have control panels on 3 doors; 2 exterior doors and 1 interior closet. The exterior doors have a green horizontal bar on the top of the panel when the system is disarmed. When the system is armed, the bar turns red. The interior closet door has a vertical bar on the right (same side as the door) which is red when the door is normally locked. When the door is unlocked, the bar turns green. It turns red again as the door locks.
The control panel is operated by entering a 5 digit code using the four buttons on top of the board. As you press buttons, the middle row of LED's will turn purple and indicate how many buttons you've pressed (it also beeps!). If you don't enter a complete 5 digit code within a few seconds, the panel will show a red X and reset “buttons pressed” bar. If you enter all 5 digits, the LED_Panel will send a serial message to the master node. The master node will interpret the code and execute the function - arming/disarming the system, turning on ambient lights, unlocking a door, etc.
Of course, this has the major drawback of basically requiring myself to remember a bunch of button sequences - not exactly user friendly! I have plans to build a much more polished touch screen control panel for future versions of the system, but in the mean time, these control panels do the job. Plus, I programmed a lot of random fun functions into the system, so it's fun to just press buttons and see what happens!
Ambient Lighting
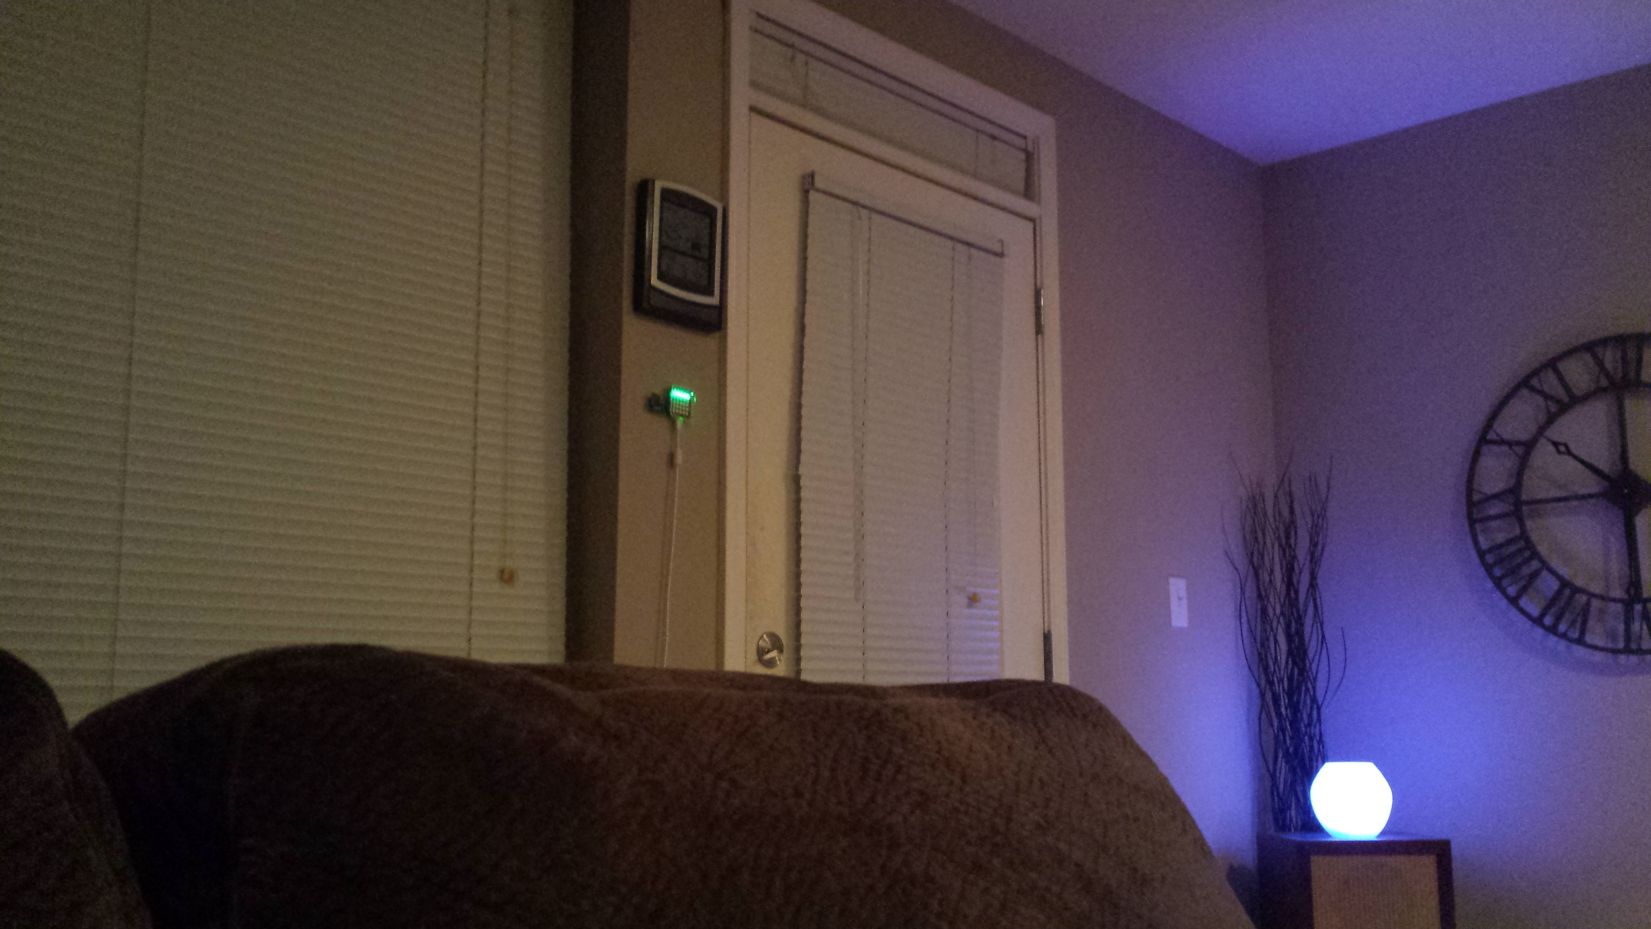
Ambient lighting modules use the same LED_Panel connected over serial to an LED Panel module. This node has a 5×5 array of RGB LED's that are used for ambient lighting. Unlike the control panels, these modules generally don't have any buttons or a case installed. Instead, they are placed in strategic places around my apartment to provide a nice ambient lighting.
Although these modules have the same LED_Panel firmware, generally they are used as a solid color display or in a blinking mode. For example, when you open a door while the system is armed, all of the LED_Panels will begin to blink yellow as a warning. If you don't authenticate and disable the system, they will begin to flash red as the actual alarm is triggered.
Web Interface
The web interface is written in PHP and HTML and allows easy monitoring and configuration of the system. The interface is run on a web server on the same Raspberry Pi as the master node python script. Data is stored in a MySQL database, which is shared by both the web interface and the master node python script.
Main Page
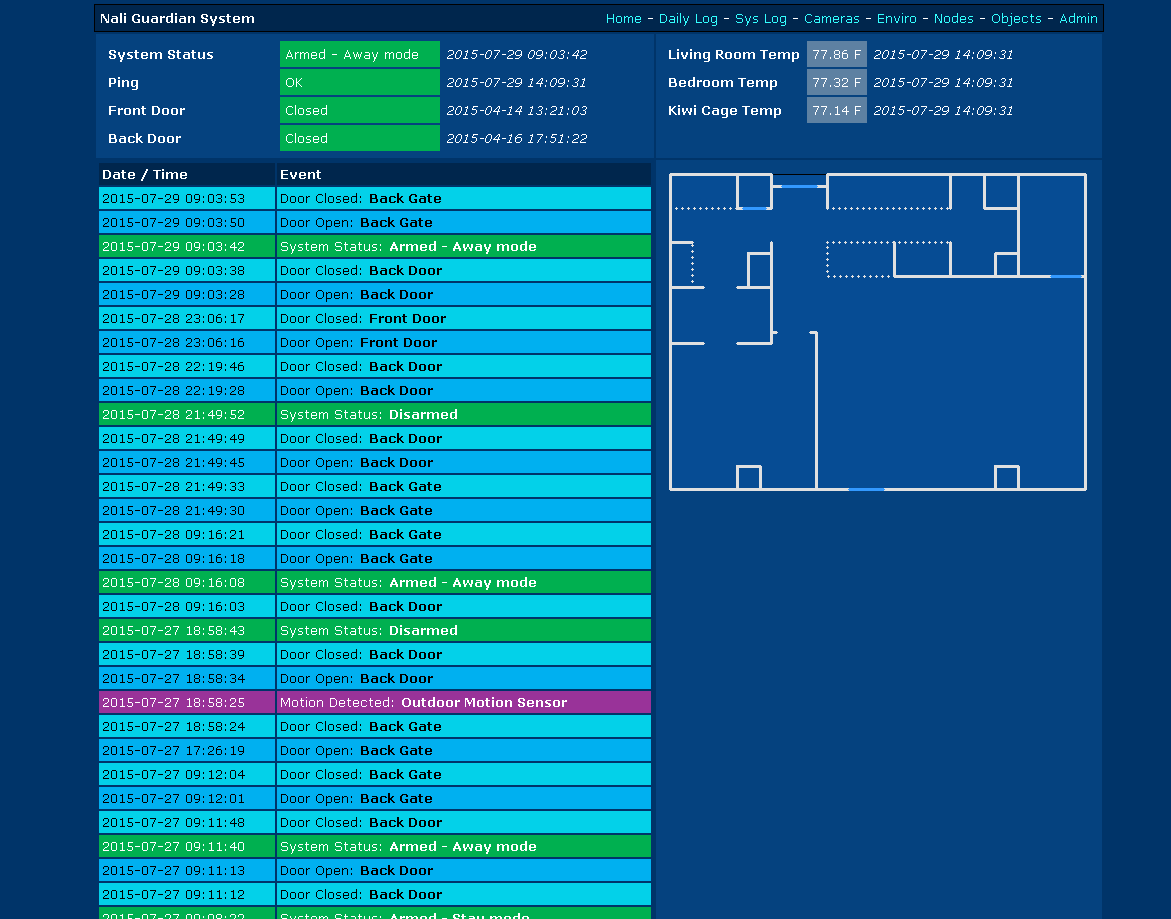
The main page displays summary data and an overall status of the system. On the top left, there are status displays for the current system state (armed/disarmed), an update ping (provides indication when the python script has failed), and the status of two exterior doors. On the top right, the temperature of the three EnviroNode sensors is displayed, including the time when the reading was taken. This data is loaded dynamically - if a new EnviroNode is added to the system, it will also be display here on the main page.
On the left side of the page, a list of events is displayed with the most recent event at the top. There is a wide variety of “events” in the system - Door Open/Closed, Motion sensor detentions, security alerts, and other such events.
All of the data on this page is updated in real time using some JavaScript - if you open a door while the page is loaded, the status for the door will change, and a Door Open event will appear on the event list.
Environmental
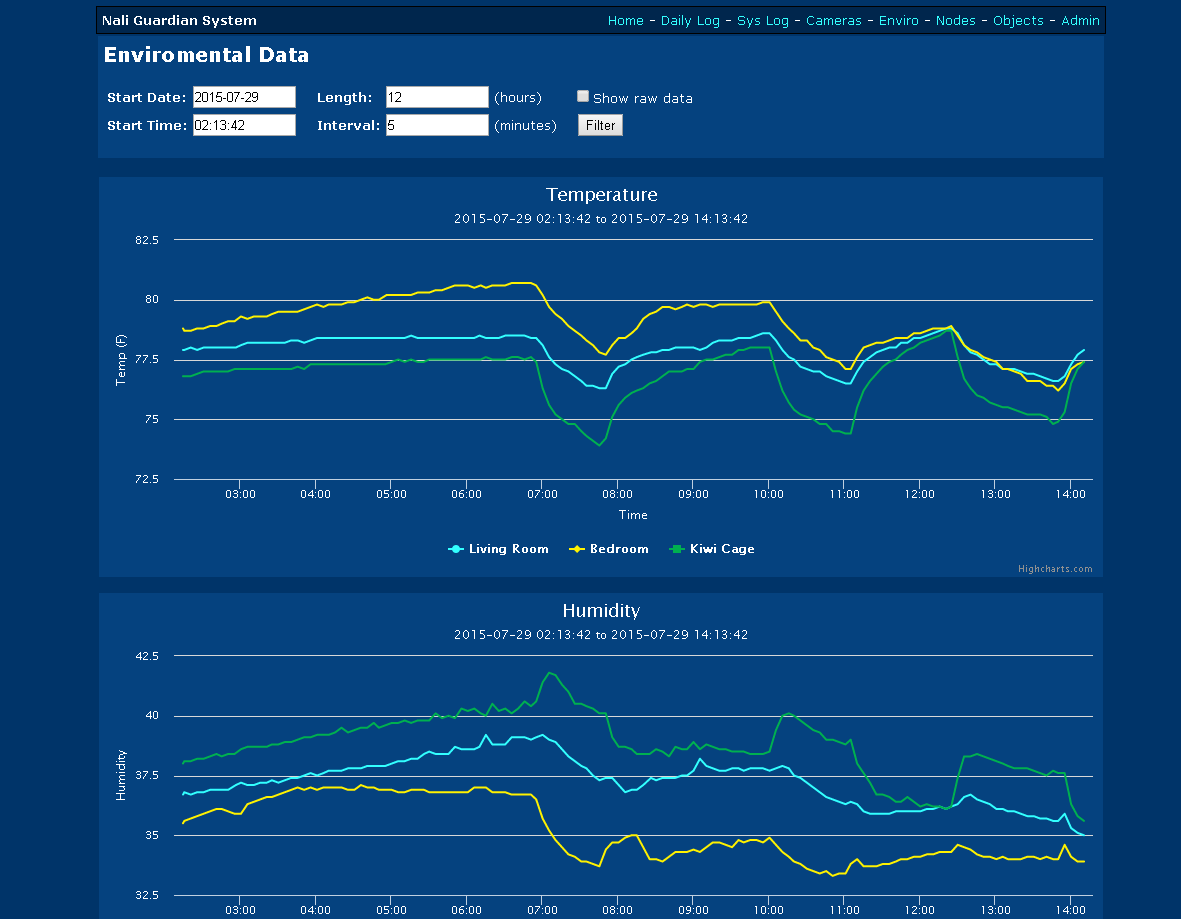
The envrio page displays historical data that was captured from the EnviroNodes in the system. Temperature, humidity, and ambient light data is captured from each sensor every 60 seconds and stored in the MySQL database.
I used Highcharts to display the data graphically. I found this to be a really easy tool and an awesome way to display the data interactively. Using some PHP form functions, you can specify any data/time range as desired and view the available environmental data.
This page is dynamic - it will attempt to load data from all configured EnviroNodes. When a new EnviroNode is added to the system, the data for the new node can be view on this page as soon as it is available.
Logging
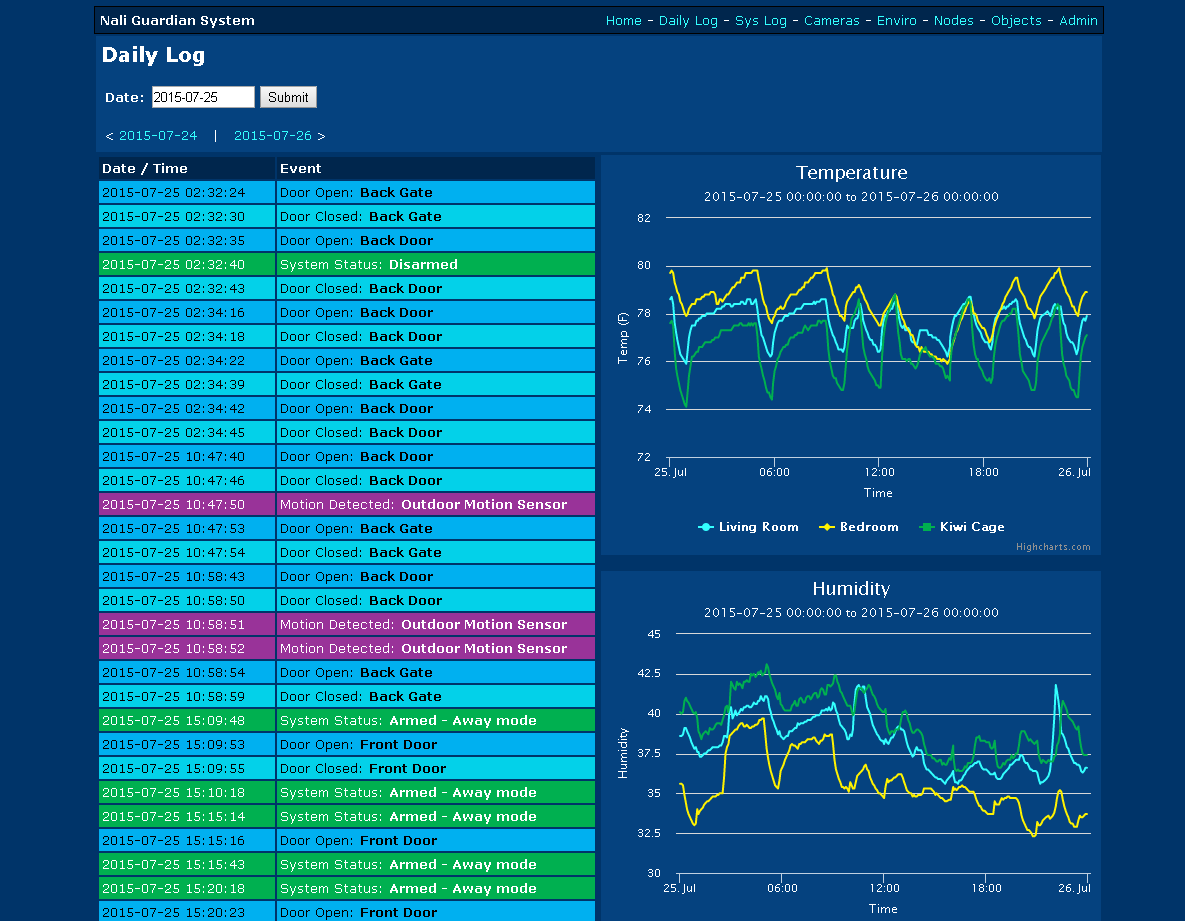
The Daily Log page is designed to be a “summary” page for any given day. On the left side of the screen, all of the events from a given day (from 00:00 to 23:59) are displayed with the earliest date on the top (most recent event on the bottom). On the right side of screen, the full 24 hours of environmental data for that day is displayed.
This page is particularly useful when I'm traveling. I have some pets that a friend takes care of for me when I'm away, and with the Daily Log page I can easily look at a glance and see that my friend came and opened doors. Additionally, I can also see the average temperatures and the temperature swings from when the AC is running - this is useful to figure out of my AC unit is running too often or not!
The System Log page is another page that simply displays the raw debug output of the python script. This is mostly used for debugging purposes, but I also consider this the “complete” log, as it includes all object events, even if they aren't configured to explicitly be logged.
Node Configuration

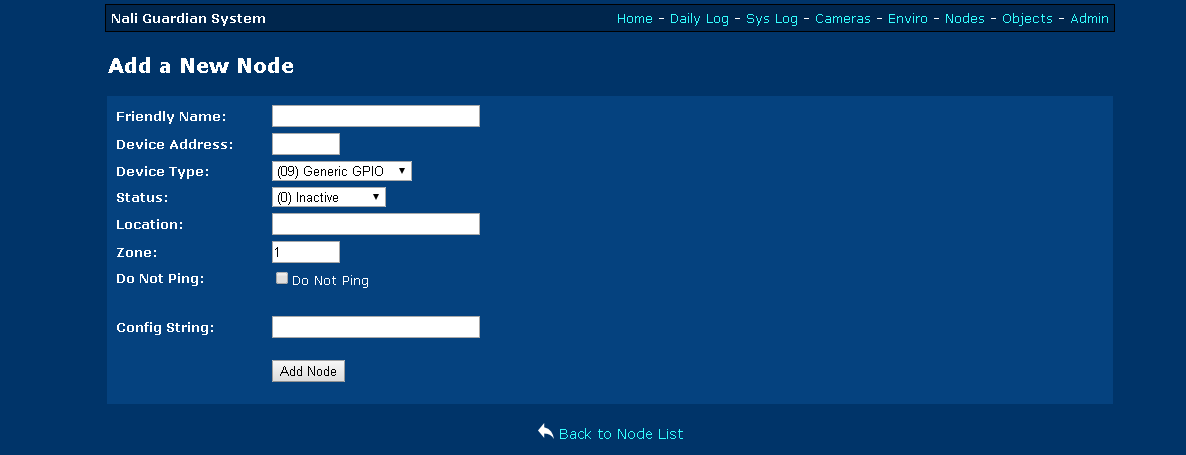
The node status page is really the heart of the system. This is where I configure the system with all of the wireless modules that are being used in the system. Nodes can be added, removed or modified at any time using this page. When the master node python script starts up, it queries the database for the current list of nodes and pings each node. If the node list is modified in any way, a flag is set in the MySQL database, and the master node detects this and updates its internal node list.
By using this flexible node system, I can add new nodes to the system very easily. Want to start recording the temperature of another room? Just grab an EnviroNode and a new wireless module, add the module to the node list with the web interface, and the system will immediately begin using the new node.
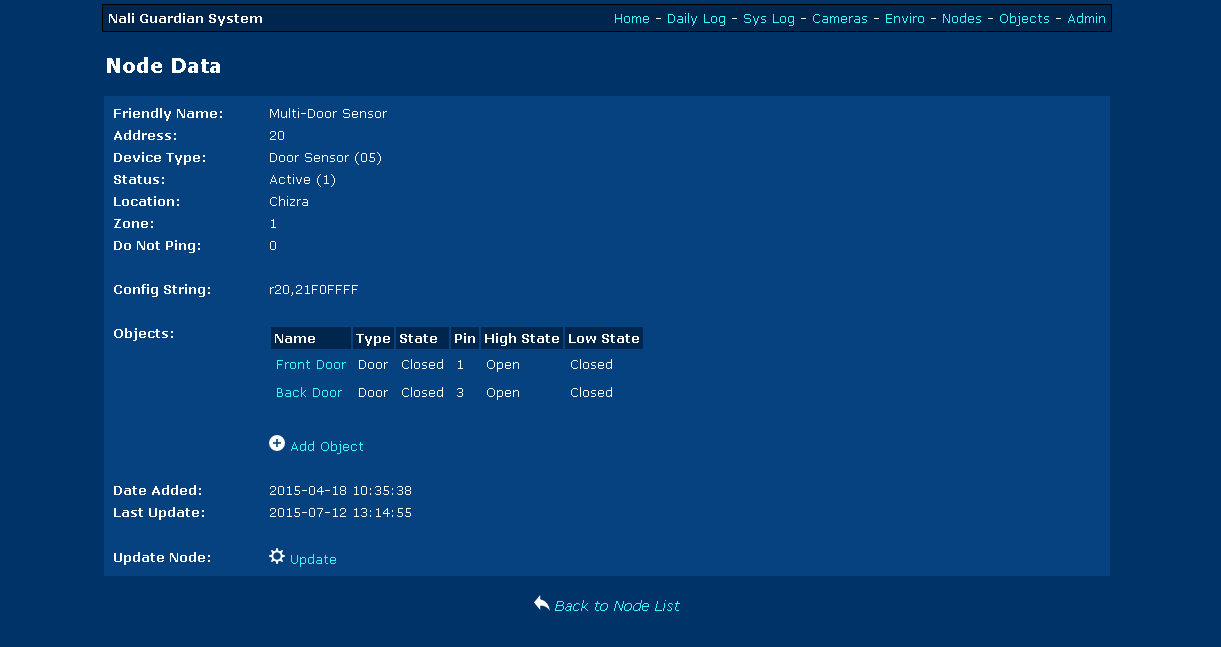
Clicking on any of the nodes will bring up a node configuration page. This page shows all the configuration information for that node such as the device address, device type, last update, etc. Additionally, it also will show a list of objects assigned to the node's GPIO pins. You can then click on any of those objects to view their status.
Object Configuration
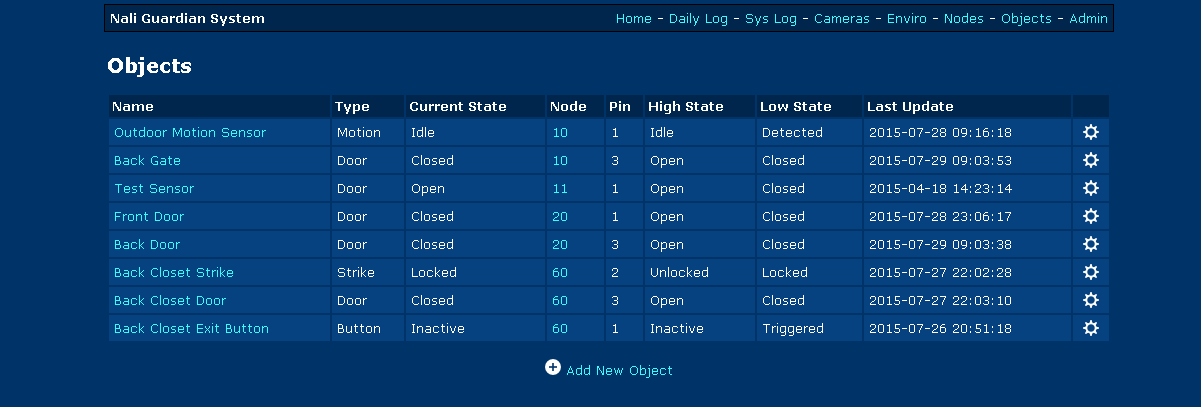
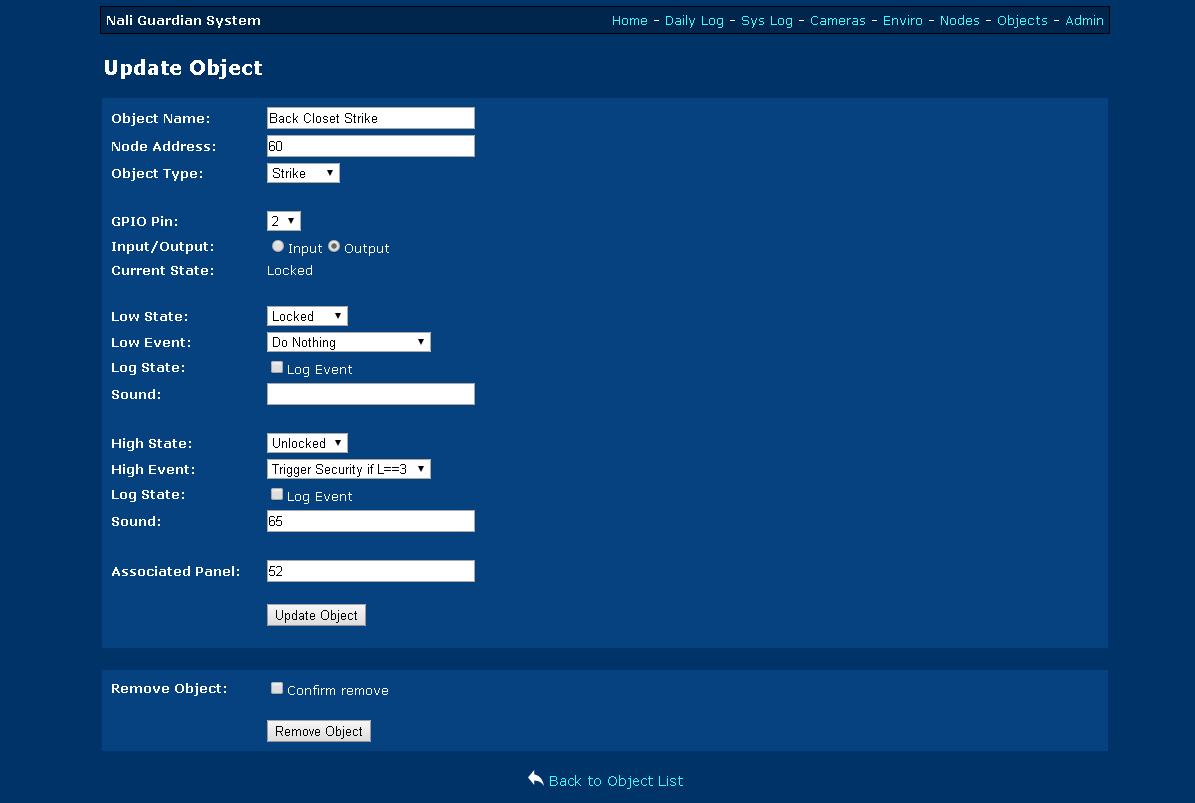
The object status page shows a list of configured objects and allows adding, modifying and removing objects. As with the node status page, the master node script will automatically refresh its internal object list when there are any changes on the web interface.
In this system, an “object” is essentially a GPIO pin on a wireless module. The wireless module can be configured to send an alert when a pin goes high or low, and the state of the GPIO pin is mapped to a system state. If the pin is configured as an output, that object can also be controlled. Objects include doors, windows, motion sensors, buttons, electronic strikes, and other options. The system can be configured to take different actions when an object's state changes from one to the other.
For each state change, an object can have a sound play, log the event, and perform some other task. Currently, that list of tasks is pre-defined (like “activate alarm”), but eventually I'd like to integrate some kind of small scripting language.
Cameras
I have one Foscam set up in my apartment. The Camera page will display a JPEG of the current camera view. Eventually I plan to have more cameras and controls for the cameras located on this page, but for now it is mostly a placeholder.
Currently, the Foscam is controlled from the master node using the HTTP API. When the front or back door opens, the camera will pan to view that door. When the security system is armed, the motion detection settings are enabled. This means that any movement in my apartment is recorded - but only when the system is armed. When the security system is disarmed, motion detection is disabled.
Admin / Settings
The administration page is mostly non-functional currently, but it does allow setting a few timing parameters for the system. The amount of time you have to disable the system, the security codes, and other settings.
In the future, I'd like to make this a multi-user system, and part of this page will allow user management.
Future Expansion
I don't really plan on “finishing” this system. Rather, I'd like to think that this project is just something that I constantly am tinkering with, carrying forward and evolving. I am constantly thinking of new ideas I want to implement, or am inspiring by other projects I see online. So I'm just going to continue improving the software, building more hardware, and enhancing the system.
There are several key items that I definitely would like to add in the future:
- Touch screen control panel (probably web-based with Raspberry Pi and small HDMI screen)
- 120VAC lightswitch controller - replace light switches with module that can be controlled wirelessly
- Cellular communication backup
- Digital lock on front door
- Custom thermostat controlled by system
- Upgrade audio system to use wireless audio streaming
- More sensors - carbon monoxide, smoke, outside weather
- Multi-user management
I am already planning the implementation of some of these features. Most importantly, my next generation system will be distributed - there will be multiple master nodes that will coordinate and synchronize their data. This added redundancy will hopefully make the system much more robust!
Writeup: July 2015
Page Tools
